banner


How To Remove Battery From Moto Z2 Play

Introduction

Employ this guide to replace the audio jack on your Motorola Z2 Play.

Alert: Because of the strong adhesive securing the display, minimal clearance for inserting your tools, and loftier oestrus required, in that location'south a adept run a risk of accidentally dissentious the brandish when removing it. If you intend to re-use the brandish, take serious care when heating and inserting tools to separate the display from the rest of the device.

  1. Power off your phone before you complete any replacement steps.

    • Ability off your phone before yous consummate whatsoever replacement steps.

  2. Heat the edges of your Motorola Moto Z2 Play screen for two to three minutes with a heat gun. You adjust the heat gun to 85 degrees centigrade, and be careful not to hold the heat gun on one position for too long; to avoid damaging, or "hotspotting" the LCD. The screen should be very warm, but not painful, to the touch. Reheat as necessary.

    • Heat the edges of your Motorola Moto Z2 Play screen for ii to three minutes with a estrus gun. You adjust the heat gun to 85 degrees centigrade, and be conscientious not to concord the rut gun on one position for as well long; to avoid damaging, or "hotspotting" the LCD. The screen should be very warm, only not painful, to the impact. Reheat equally necessary.

    • If screen is cracked put strong adhesive tape across the screen in guild to avoid breaking the screen further and receiving cuts.

    • If you don't take access to a oestrus gun, a hair dryer tin can be used.

  3. Place suction cup in the middle of the screen and press down.

    • Identify suction cup in the heart of the screen and printing downwardly.

  4. Pry the screen by wedging the plastic opening tool under the screen at the charging port. Work your way around the screen with the plastic opening tool. When you pry near the top-right and bottom-right corners, be careful not to pry too far, or you risk damaging the display cable.

    • Pry the screen by wedging the plastic opening tool nether the screen at the charging port.

    • Piece of work your way around the screen with the plastic opening tool.

    • When you pry near the top-right and bottom-right corners, be careful not to pry also far, or you risk damaging the display cable.

    • Consummate these steps advisedly because the screen is delicate and can easily crack. If the screen begins to resist prying, reheat the agglutinative with your heat gun.

  5. Use a suction cup to lift up screen from left to right. If you don't have a suction cup, wedge a spudger or a small plastic card under the screen and lift slowly. Failure to lift screen from left to right can cause damage to interior wires of your phone.

    • Use a suction loving cup to lift upwardly screen from left to right.

    • If you don't have a suction cup, wedge a spudger or a small plastic bill of fare nether the screen and elevator slowly.

    • Failure to lift screen from left to right tin crusade harm to interior wires of your phone.

  6. Identify ribbon connector at the top right of the phone. Pry the black locking bar up gently with a plastic opening tool. Remove the ribbon wires by pulling them out of the connector with a tweezer.

    • Identify ribbon connector at the top correct of the telephone.

    • Pry the blackness locking bar up gently with a plastic opening tool.

    • Remove the ribbon wires past pulling them out of the connector with a tweezer.

    • The locking bar is the minor black bar located on the digitizer's ZIF connector.

    • Be sure to push the locking bar back down using a spudger afterward you put the ribbon wire back in since the lock does not lock automatically.

  7. Identify the ribbon cable, located at the bottom right of the phone. Disconnect the ribbon cable, located at the bottom right of the phone, by pulling out and back with tweezers. Excessive force is not needed.

    • Place the ribbon cablevision, located at the lesser right of the phone.

    • Disconnect the ribbon cablevision, located at the bottom correct of the phone, by pulling out and dorsum with tweezers.

    • Excessive force is non needed.

  8. Lift the screen from the phone to completely detach.

    • Lift the screen from the telephone to completely detach.

    • If screen doesn't detach, go back to footstep 7 and 8 to make certain the bar is unlocked and ribbon connector is fully detached.

    • During reassembly, you may need to apply or replace the display adhesive on your display assembly. Utilise our brandish adhesive awarding guide to apply the adhesive and reseal your device.

  9. Remove the orange tape, located at the bottom right of the phone, using tweezers. Do not discard tape.

    • Remove the orange tape, located at the bottom right of the phone, using tweezers.

    • Practise non discard record.

  10. Detach the red and black battery wire by lifting up with tweezers. Detach the red and black battery wire by lifting up with tweezers.

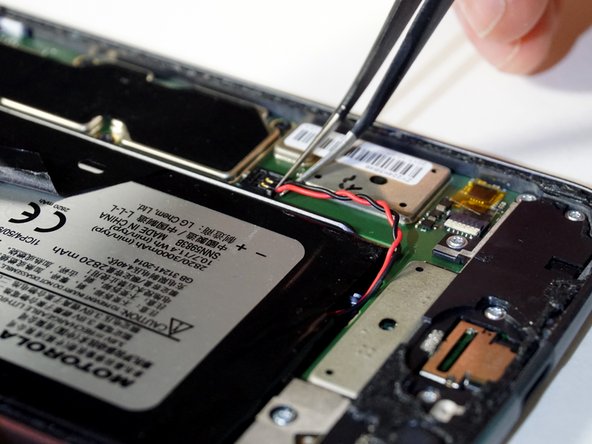
    • Detach the red and black battery wire past lifting up with tweezers.

  11. Peel back the black tape that is located on the battery. Make sure you pull back gently so you can reuse the tape with reassembly.

    • Peel back the black record that is located on the battery.

    • Make sure y'all pull back gently so y'all can reuse the tape with reassembly.

  12. Lift  the black tape and slide a card under the battery. Align the card parallel and under the battery. Wedge the card further under the battery.

    • Elevator the black tape and slide a bill of fare under the battery.

    • Marshal the card parallel and nether the bombardment.

    • Wedge the card farther under the bombardment.

    • Lift the bill of fare up to assist in removing the bombardment from the adhesive.

  13. Lift to remove the battery from the device completely.

    • Lift to remove the battery from the device completely.

  14. Remove the seven silver 2.6 mm T3 Torx screws on the black battery cable cover at the bottom of the phone with a screwdriver by turning counterclockwise.

    • Remove the seven silver 2.six mm T3 Torx screws on the black battery cablevision comprehend at the bottom of the phone with a screwdriver by turning counterclockwise.

    • Remove the single black 3.5 mm T3 Torx spiral on the blackness bombardment cablevision embrace at the bottom of the phone with a screwdriver past turning counterclockwise.

    • It is helpful to keep screws on a magnetic surface to avoid losing them.

  15. Lift  the battery cover with tweezers starting on the right side slightly to dislodge the cover. Lift  the battery cover with tweezers from the left side slightly to dislodge the cover. Remove the battery cover with tweezers by solidly gripping the left side of the cover and lifting up.

    • Lift the battery encompass with tweezers starting on the right side slightly to dislodge the embrace.

    • Lift the battery cover with tweezers from the left side slightly to dislodge the cover.

    • Remove the battery embrace with tweezers past solidly gripping the left side of the embrace and lifting up.

  16. Tilt the front of the black audio jack up with tweezers. Lift the audio jack out of its housing with tweezers. Little force is required to remove the audio jack.

    • Tilt the front of the blackness audio jack up with tweezers.

    • Lift the audio jack out of its housing with tweezers.

    • Little forcefulness is required to remove the sound jack.

Determination

To reassemble your device, follow these instructions in reverse social club.

Team

Embed this guide

Choose a size and copy the code below to embed this guide as a pocket-size widget on your site / forum.

Preview

How To Remove Battery From Moto Z2 Play,

Source: https://www.ifixit.com/Guide/Motorola+Moto+Z2+Play+Audio+Jack+Replacement/103357

Posted by: costasomper.blogspot.com

0 Response to "How To Remove Battery From Moto Z2 Play"

Post a Comment

Iklan Atas Artikel

Iklan Tengah Artikel 1

Iklan Tengah Artikel 2

Iklan Bawah Artikel